![[PukiWiki]](image/pukiwiki.png "[PukiWiki]")
このページは、学部2年生向け授業である、「マルチメディアプログラミング実習」 のために用意しました。
(Wikiの仕様で大文字小文字が混在した英単語に疑問符?が追加されるところがありますが、無視してください。)
マウスイベントを受け取るには、Mouse ListenerやMouse Motion Listenerなどをインプリメントします。 以下のようにするとイベントをうけとれるます。
まずはMouse Motion Listenerを試してみましょう。 マニュアル
によると、実装しないといけないメソッドはmouse Draggedとmouse Movedです。
import java.awt.*;
import javax.swing.*;
import java.awt.event.*;

public class MouseTest extends JFrame implements MouseMotionListener{

	public void mouseDragged(MouseEvent e) {
		System.out.println("mouse dragged!");
	}
	public void mouseMoved(MouseEvent e) {
		System.out.println("mouse moved!");
	}

	public static void main(String[] args) {
		MouseTest test = new MouseTest();
		test.setTitle("MouseTest");
		test.addMouseMotionListener(test);
		test.setSize(400,300);
		test.setVisible(true);
		test.setDefaultCloseOperation(JFrame.EXIT_ON_CLOSE);
	}

}
次に、Mouse Listenerも実装してみましょう。マニュアル
によると、
これを追加します。宣言で
public class MouseTest extends JFrame implements MouseListener, MouseMotionListener{
として、またmainに
test.addMouseListener(test);
を追加します。
import java.awt.*;
import javax.swing.*;
import java.awt.event.*;

public class MouseTest extends JFrame implements MouseListener, MouseMotionListener{

	public void mouseClicked(MouseEvent e) {
		System.out.println("mouse clicked!");
	}
	public void mouseEntered(MouseEvent e) {
		System.out.println("mouse entered!");
	}
	public void mouseExited(MouseEvent e) {
		System.out.println("mouse exited!");
	}
	public void mousePressed(MouseEvent e) {
		System.out.println("mouse pressed!");
	}
	public void mouseReleased(MouseEvent e) {
		System.out.println("mouse released!");
	}
	public void mouseDragged(MouseEvent e) {
		System.out.println("mouse dragged!");
	}
	public void mouseMoved(MouseEvent e) {
		System.out.println("mouse moved!");
	}

	public static void main(String[] args) {
		MouseTest test = new MouseTest();
		test.setTitle("MouseTest");
		test.addMouseListener(test);
		test.addMouseMotionListener(test);
		test.setSize(400,300);
		test.setVisible(true);
		test.setDefaultCloseOperation(JFrame.EXIT_ON_CLOSE);
	}

}
http://siio.jp/lecture/Sounds/Ping.aiff
(他にも、Basso.aiff Frog.aiff Hero.aiff Pop.aiff Submarine.aiff Blow.aiff Funk.aiff Morse.aiff Purr.aiff Tink.aiff Bottle.aiff Glass.aiff Ping.aiff Sosumi.aiff を置いておきました)
これを再生するプログラムを作ってみましょう。以下で再生できます。
import java.io.File;
import javax.sound.sampled.*;

public class AudioInputStreamExample {
  public static void main(String[] args) {

    try {
      File file = new File("Ping.aiff");
      AudioInputStream stream = AudioSystem.getAudioInputStream(file);
      Clip clip = AudioSystem.getClip();
      clip.open(stream);
      clip.start();

      // sleep to allow enough time for the clip to play
      Thread.sleep(500);

      stream.close();

    } catch (Exception ex) {
      System.out.println(ex.getMessage());
    }
  }
}
以下の内容の新しいファイル,buttontest.cを作ってください. printfの逆スラッシュが正しくコピペできてないかもしれないので,注意してください. 入力が面倒なら,添付ファイルの buttontest.c をダウンロードしてください.
#include <X11/Xlib.h>
#include <stdio.h>

int main (){
	Display *display = XOpenDisplay (NULL);
	XEvent event;
	Window window = XCreateSimpleWindow(display, DefaultRootWindow(display),0,0,150,100,0,0,0);
	XSelectInput(display,window,KeyPressMask | ButtonPressMask |  ButtonReleaseMask);
	XMapWindow(display, window);
	XFlush(display);

	while(1) {
		XNextEvent(display,&event);
		switch (event.type) {
		  case KeyPress:
			printf("key\n");
			break;
		  case ButtonPress:
			printf("button down\n");
			printf("button\n");
			break;
		  case ButtonRelease:
			printf("button up\n");
			break;
		}
	}
	return 0;
}
以下のコマンドでコンパイルしてください.
cc -L/usr/X11R6/lib -I/usr/X11R6/include buttontest.c -lX11
出来上がったファイルを,./a.outで実行してください.
How2MacOSXProgramming を見てください
How2iPhoneProgramming を見てください
import java.awt.*;
import javax.swing.*;
import java.awt.event.*;

class SimpleAnime extends JFrame {

	private void init() {
		this.setTitle("SimpleAnime");
		this.setSize(300,200);
		this.setVisible(true);
		this.setDefaultCloseOperation(JFrame.EXIT_ON_CLOSE);
	}

	public static void main(String[] args) {
		SimpleAnime frame = new SimpleAnime();
		frame.init();
	}
}
import java.awt.*;
import javax.swing.*;
import java.awt.event.*;
class SimpleAnime extends JFrame {
JPanel panel;
Graphics g;
private void init() {
this.setTitle("SimpleAnime");
this.setSize(300,200);
panel = new JPanel();
this.getContentPane().add(panel);
this.setVisible(true);
this.setDefaultCloseOperation(JFrame.EXIT_ON_CLOSE);
g=panel.getGraphics();
g.setColor(Color.blue);
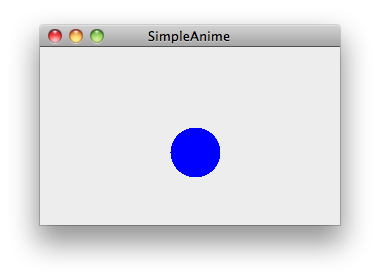
int x=0, xdelta=10;
while(true) {
g.fillOval(x,80,50,50);
try{Thread.sleep(50);}catch(Exception e){}
g.clearRect(x, 80, 52,52);
x+=xdelta;
if(x>250) xdelta=-10;
if(x<0) xdelta=10;
}
}
public static void main(String[] args) {
SimpleAnime frame = new SimpleAnime();
frame.init();
}
}
上記のプログラムでは、main()で、frame.init()したあと、このメソッドで無限にアニメーション書き換えを行うことになります。なので、二度とmain()には戻ってきません。(以下で示した、メニューは、また別のスレッドで動くので、このままでも動きます)
アニメーションだけをするなら、これでも良いのですが、他にも仕事をしたい場合には難しいですし、やれないことはないですが、タイミングを計るのが難しいです。ということで、アニメーションする部分は、別のスレッドにして、そちらに任せてしまうのが通常です。
以下のように、別のインスタンスを別スレッドで動かします。別スレッドで動かすインスタンスを作るために、Animatorという名前のクラスを用意しました。別スレッドで動かすためには、Runnableをimplementする必要があります。ここで必須のrunというメソッドが、裏で実行されるので、そこに、上記のプログラムのアニメーション描画部分をそっくり移動させます。Graphics gの情報を伝えておく必要があるので、それを設定するメソッドも作りました。アニメーションしつつ、main()の方で数字を表示しています。
import java.awt.*;
import javax.swing.*;
import java.awt.event.*;
import java.lang.Thread;

class Animator implements Runnable {
	Graphics g;

	public void setGraphics(Graphics animeG) {
		g=animeG;
	}

	public void run() {
		int x=0, xdelta=10;
		while(true) {
			g.fillOval(x,80,50,50);
			try{Thread.sleep(50);}catch(Exception e){}
			g.clearRect(x, 80, 52,52);
			x+=xdelta;
			if(x>250) xdelta=-10;
			if(x<0) xdelta=10;
		}
	}
}

class SimpleAnime extends JFrame {
	JPanel panel;
	Graphics g;
	Animator animator;

	private void init() {
		animator=new Animator();
		this.setTitle("SimpleAnime");
		this.setSize(300,200);
		panel = new JPanel();
		this.getContentPane().add(panel);
		this.setVisible(true);
		this.setDefaultCloseOperation(JFrame.EXIT_ON_CLOSE);
		g=panel.getGraphics();
		g.setColor(Color.blue);

		animator.setGraphics(g);
		new Thread(animator).start();
	}

	public static void main(String[] args) {
		SimpleAnime frame = new SimpleAnime();
		frame.init();

		for(int i=0;;i++) {
			System.out.println(i);
			try {Thread.sleep(500);}catch(Exception e){}
		}
	}
}
こういうのを作ってほしい
http://lab.siio.jp/index.php?plugin=attach&pcmd=open&file=SimpleAnime.class&refer=Lecture
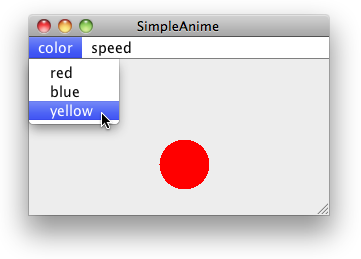
ヒント:上のアニメーションのプログラムに、メニューを取り付けて、 action Performedでメニューからのイベントを受け取れば良いです。 メニューの動きは、プログラム本来の動きと並列に動いてくれるので、 上のアニメーションのようなアニメーション以外何もできない手抜きアニメーションでも、 メニューは動いてくれます。
ヒント: action Performed ではこうしたら良い
public void actionPerformed(ActionEvent e) {
		String command = e.getActionCommand();
		if(command=="red") g.setColor(Color.red);
		if(command=="blue") g.setColor(Color.blue);
ヒント:メニューはSimple Animeでつくって、action listenerをanimatorにしました。メニューを作るところがながいので、メソッドに分けました。
import java.awt.*;
import javax.swing.*;
import java.awt.event.*;
import java.lang.Thread;

class Animator implements Runnable, ActionListener {

略
	public void actionPerformed(ActionEvent e) {
		String command = e.getActionCommand();
		if(command !=null) {
			System.out.println(command);
		}
		if(command=="red") g.setColor(Color.red);
		if(command=="blue") g.setColor(Color.blue);
		if(command=="yellow") g.setColor(Color.yellow);
		if(command=="fast") xdelta=30;
		if(command=="slow") xdelta=5;
	}

略

}

class SimpleAnime extends JFrame  {

略


	private void makeMenu() {
		JMenuBar menubar = new JMenuBar();
		JMenu menu = new JMenu("color");
		JMenu menuSpeed = new JMenu("speed");

		JMenuItem item1 = new JMenuItem("red");
		item1.addActionListener(animator);
		item1.setActionCommand("red");
		JMenuItem item2 = new JMenuItem("blue");
		item2.addActionListener(animator);
		item2.setActionCommand("blue");
		JMenuItem item3 = new JMenuItem("yellow");
		item3.addActionListener(animator);
		item3.setActionCommand("yellow");
		menu.add(item1);
		menu.add(item2);
		menu.add(item3);

		JMenuItem item4 = new JMenuItem("fast");
		item4.addActionListener(animator);
		item4.setActionCommand("fast");
		JMenuItem item5 = new JMenuItem("slow");
		item5.addActionListener(animator);
		item5.setActionCommand("slow");
		menuSpeed.add(item4);
		menuSpeed.add(item5);

		menubar.add(menu);
		menubar.add(menuSpeed);
		this.setJMenuBar(menubar);
	}

略

}
上記のプログラムにメニューを追加して、 ボールの色と速さをメニューで指定するようにしました。 メニューはメインのJFrameインスタンスで作ってこれに貼りつけていますが、 Action Listenerは、別スレッドで動いているAnimatorクラスのインスタンスとしました。
import java.awt.*;
import javax.swing.*;
import java.awt.event.*;
import java.lang.Thread;

class Animator implements Runnable, ActionListener {
	Graphics g;
	int xdelta =5;

	public void setGraphics(Graphics animeG) {
		g=animeG;
	}

	public void actionPerformed(ActionEvent e) {
		String command = e.getActionCommand();
		if(command !=null) {
			System.out.println(command);
		}
		if(command=="red") g.setColor(Color.red);
		if(command=="blue") g.setColor(Color.blue);
		if(command=="yellow") g.setColor(Color.yellow);
		if(command=="fast") xdelta=30;
		if(command=="slow") xdelta=5;
	}

	public void run() {
		int x=0;
		while(true) {
			g.fillOval(x,80,50,50);
			try{Thread.sleep(50);}catch(Exception e){}
			g.clearRect(x, 80, 52,52);
			x+=xdelta;
			if(x>250) xdelta=-xdelta;
			if(x<0) xdelta=-xdelta;
		}
	}
}

class SimpleAnime extends JFrame  {
	JPanel panel;
	Graphics g;
	Animator animator;

	private void makeMenu() {
		JMenuBar menubar = new JMenuBar();
		JMenu menu = new JMenu("color");
		JMenu menuSpeed = new JMenu("speed");

		JMenuItem item1 = new JMenuItem("red");
		item1.addActionListener(animator);
		item1.setActionCommand("red");
		JMenuItem item2 = new JMenuItem("blue");
		item2.addActionListener(animator);
		item2.setActionCommand("blue");
		JMenuItem item3 = new JMenuItem("yellow");
		item3.addActionListener(animator);
		item3.setActionCommand("yellow");
		menu.add(item1);
		menu.add(item2);
		menu.add(item3);

		JMenuItem item4 = new JMenuItem("fast");
		item4.addActionListener(animator);
		item4.setActionCommand("fast");
		JMenuItem item5 = new JMenuItem("slow");
		item5.addActionListener(animator);
		item5.setActionCommand("slow");
		menuSpeed.add(item4);
		menuSpeed.add(item5);

		menubar.add(menu);
		menubar.add(menuSpeed);
		this.setJMenuBar(menubar);
	}

	private void init() {
		animator = new Animator();
		this.setTitle("SimpleAnime");
		this.setSize(300,200);
		this.makeMenu();
		panel = new JPanel();
		this.getContentPane().add(panel);
		this.setVisible(true);
		this.setDefaultCloseOperation(JFrame.EXIT_ON_CLOSE);
		g=panel.getGraphics();
		g.setColor(Color.blue);

		animator.setGraphics(g);
		new Thread(animator).start();
	}

	public static void main(String[] args) {
		SimpleAnime frame = new SimpleAnime();
		frame.init();

		for(int i=0;;i++) {
			System.out.println(i);
			try {Thread.sleep(500);}catch(Exception e){}
		}
	}
}
アニメーションの途中で、ボールがちらつくことがあります。 ボールの場所を矩形で消して、新しいボールを描いているので、 その途中の作業が見えてしまうからです。 これを無くすには、ダブルバッファの手法を用います。 すなわち、描画する面をもう一枚用意して、 そちらに描画し、 描画が終わったところで、一気に更新する方法です。
ダブルバッファの手法は、授業の最終課題である「お絵かきプログラム」のところで説明します。
JPanelのサブクラスを作りました。
import javax.swing.JPanel;
import java.awt.Graphics;

public class DrawPanel extends JPanel {

	public void drawLine(int x1, int y1, int x2, int y2){
		Graphics g = this.getGraphics();
		g.drawLine(x1, y1, x2, y2);
	}
 }
こちらはメインのプログラム。JFrameのサブクラスで、これに上記のJPanelのサブクラスを貼付けます。 リスナーになっているので、こちらでマウスなどのイベントを受け取ります。
import java.awt.event.MouseEvent;
import java.awt.event.MouseMotionListener;

import javax.swing.JFrame;

public class SimpleDraw extends JFrame implements MouseMotionListener {

	int lastx=0, lasty=0, newx, newy;
	DrawPanel panel;


	public void mouseMoved(MouseEvent arg0) {
       }

	public void mouseDragged(MouseEvent arg0) {
		newx=arg0.getX();
		newy=arg0.getY();
		panel.drawLine(lastx,lasty,newx,newy);
		lastx=newx;
		lasty=newy;
	}


	private void init() {
		this.setTitle("Simple Draw");
		this.setSize(300, 200);
		this.addMouseMotionListener(this);
		panel=new DrawPanel();
		this.getContentPane().add(panel);
		this.setVisible(true);
		this.setDefaultCloseOperation(JFrame.EXIT_ON_CLOSE);
	}

	public static void main(String[] args) {
		SimpleDraw frame=new SimpleDraw();
		frame.init();
	}

}
いままでは、Java Applicationを作ってました。 これはjavaコマンドから実行するアプリケーションでした。 このほか、Javaには、Java Appletという実行形式式があります。 Appletは、webページなどで動かすことができます。 もともとは、webサービスでクライアント側でアプリケーションを動かすために 開発されました。
AppletはAppletクラスを継承して作ります。 Appletクラスは、java.awt.Panelを継承しています。 なにができるのかは、java のマニュアルをみてください。
たとえば、次のようなプログラムをAppletTest.javaとして作ります。 これをコンパイルします。
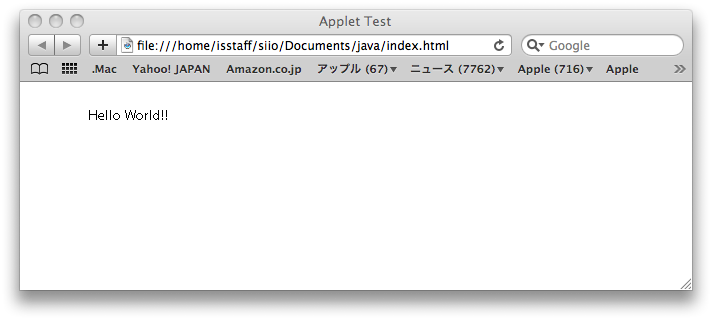
import java.awt.*;
import java.applet.*;

public class AppletTest extends Applet {
    public void paint(Graphics g) {
        g.drawString("Hello World!!", 60, 30);
    }
}
これはhtmlの中から呼び出すことができます。 たとえば、つぎのような、index.htmlをつくります。
<html>
<head><title>Applet Test</title></head>
<body>

<applet code="AppletTest.class" width="300" height="150">
</applet>

</body>
</html>
これを、さきほどコンパイルしたclassと同じディレクトリにおいて、 webブラウザで開くと、java appletのプログラムが動きます。
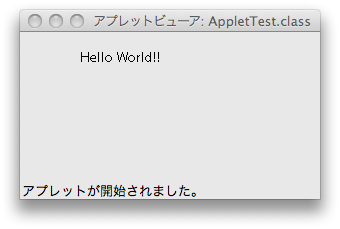
または、このhtmlファイルをアップレットビューアでみることもできます。
appletviewer index.html
などして動作を確認できます。
つぎのようにすれば、上の先の例で示す、お絵描きプログラムも作ることができます。 init()は、起動したときに最初に一度だけ呼び出されるメソッドです。
import java.awt.*;
import java.applet.*;
import java.awt.event.MouseMotionListener;
import java.awt.event.*;

public class AppletTest extends Applet implements MouseMotionListener {

int lastx,lasty,newx,newy;
Graphics g;

    public void mouseMoved(MouseEvent arg0) {
    }

    public void mouseDragged(MouseEvent arg0) {
	newx=arg0.getX();
	newy=arg0.getY();
	g.drawLine(lastx,lasty,newx,newy);
	lastx=newx;
	lasty=newy;
    }

    public void paint(Graphics g) {
	g.drawString("Hello World!!", 60, 30);
    }

    public void init() {
	g=this.getGraphics();
	this.addMouseMotionListener(this);
    }

}
appletviewerで見てみます。

webブラウザでもみてみましょう。 (注意:Safariでは、読み込まれたappletが残っていますので、 更新したappletを試すためには、 Safariを一旦終了して起動しなおしてください。)
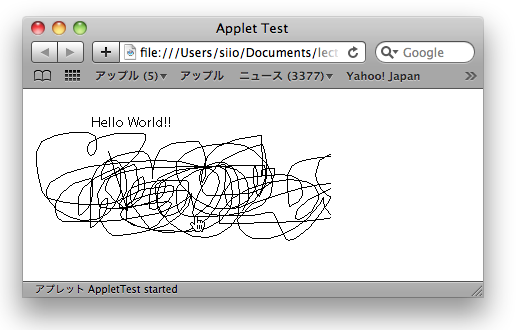
webサーバにおけば、世界中から使うこともできます。以下をクリックしてみてください。
http://siio.jp/lecture/applet/
private static final long serialVersionUID = 42L;
という変数を定義しておきます。
機能拡張の詳細はSimpleDrawの
を見てください。SimpleDrawのページでは、
の2通りの拡張を書いてあります。どちらの方針で進めていただいても結構です。 説明書に、工夫したところを書いておいてください。
/home/isstaff/siio/Public/Drop Box/.に提出してください。ターミナル.appからなら
cp 123456siioitiro.zip /home/isstaff/siio/Public/Drop\ Boxとしてください。ファインダーからなら、メニューから「移動」「フォルダへ移動...」を選んで 以下のように入力して、移動ボタンを押して、そこに現れるドロップボックスホルダに、ドラッグアンドドロップしてください。
