![[PukiWiki]](image/pukiwiki.png "[PukiWiki]")
xcodeのプログラミング
http://www.siio.jp/index.php?How2MacOSXProgramming
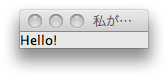
前回、ウィンドウの中に、Hello!という文字を出してみました。
解答例:
import javax.swing.*;
import java.awt.*;

public class SimpleWindow extends JFrame {

	public void initialize () {
		this.setTitle("私が作った最初の窓");

		JLabel label = new JLabel("Hello!");
		Container container = this.getContentPane();
		container.add(label);
		this.pack();

		this.setVisible(true);
		this.setDefaultCloseOperation(JFrame.EXIT_ON_CLOSE);
	}

	public static void main(String argv[]) {
		SimpleWindow sw = new SimpleWindow();
		sw.initialize();
	}

}
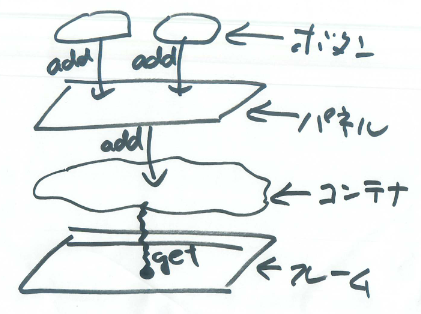
JFrameのインスタンスにgetContentPaneをお願いするとContainerインスタンスを返してくれます。 これに、JLabelのインスタンスを貼り付けると表示されるわけです(この文章に現れる?マークは無視してください)
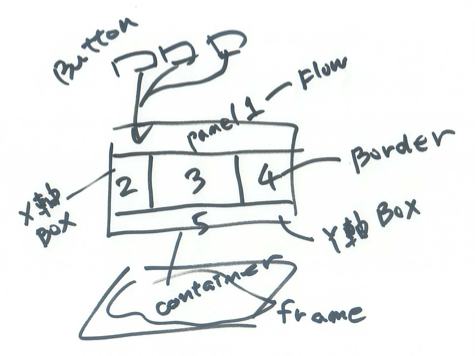
プログラム12.2をみてください。 JLabelを貼り付けたプログラムと同様に、 getContentPane()で得られたContainerに直接ボタンを貼付けることもできます。 しかしその場合、貼付けられるのは一つのボタンだけのようです。
そこでプログラム12.2では、 JPanel (パネル) に2個のボタンを貼付け、それをContainerに貼付けることで複数のボタンを表示しています。
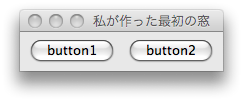
プログラム12.2を参考にして、継承を使ったプログラムによるウィンドウの中に、 2個のボタンを出してみよう。
解答例:
import javax.swing.*;
import java.awt.*;

public class SimpleButton extends JFrame {

	public void initialize () {
		this.setTitle("私が作った最初の窓");

		JPanel panel = new JPanel();
		JButton button1 = new JButton("button1");
		JButton button2 = new JButton("button2");
		panel.add(button1);
		panel.add(button2);
		Container container = this.getContentPane();
		container.add(panel);

		this.pack();
		this.setVisible(true);
		this.setDefaultCloseOperation(JFrame.EXIT_ON_CLOSE);
	}

	public static void main(String argv[]) {
		SimpleButton sw = new SimpleButton();
		sw.initialize();
	}

}
(解答例を見て実行できたら次に進んでください)
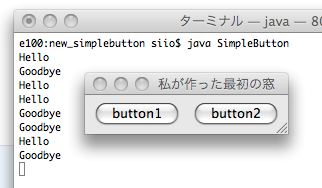
このプログラムでは,ボタンを押しても何もおこりません.
ボタンが押されたイベントを受け取るためには,
必要があります.ActionListenerをimplementするクラスはなんでも良いのですが、 教科書のプログラムでは、JFrameから作る本体クラスをイベント受け取り手にしています。 イベント受け取り専用クラスを作るなどの設計も、もちろん可能です。
プログラム12.3とこれに関する教科書の説明を読んで, ボタンを押したらprintlnで次のようなメッセージを表示するプログラムを作ってみましょう.
ヒント(最初の6行です)
import javax.swing.*;
import java.awt.*;
import java.awt.event.*;

public class SimpleButton extends JFrame implements ActionListener {

JButton button1, button2;

	public void initialize () {
解答例
import javax.swing.*;
import java.awt.*;
import java.awt.event.*;

public class SimpleButton extends JFrame implements ActionListener {

JButton button1, button2;

	public void initialize () {
		this.setTitle("私が作った最初の窓");

		JPanel panel = new JPanel();
		button1 = new JButton("button1");
		button2 = new JButton("button2");
		button1.addActionListener(this);
		button2.addActionListener(this);

		panel.add(button1);
		panel.add(button2);
		Container container = this.getContentPane();
		container.add(panel);

		this.pack();
		this.setVisible(true);
		this.setDefaultCloseOperation(JFrame.EXIT_ON_CLOSE);
	}

	public void actionPerformed (ActionEvent e) {
		if(e.getSource()==button1)
			System.out.println("Hello");
		else
			System.out.println("Goodbye");
	}

	public static void main(String argv[]) {
		SimpleButton sw = new SimpleButton();
		sw.initialize();
	}

}
(解答例を見て実行できたら次に進んでください)
ボタンは、並べ方の規則を決めて、配置することができます。このプログラムは、いくつかの方法を紹介しています。 ボタンを並べたいときの参考にしてください。
まずは、プログラム12.4を見て、上記のプログラムを拡張して5個のボタンに対応して, WEST, EAST, SOUTH, NORTH, CENTERと表示されるプログラムをつくってください。さらにこれを拡張して、プログラム13.1のようなボタンを配置して、それぞれを押すと、それぞれのボタンの名前が表示されるプログラムを作ってください。
なお、以下のようにすると、ボタンの名前を印刷することができます。
        public void actionPerformed(ActionEvent e){
                System.out.println(((JButton)e.getSource()).getText());
        }
この5枚のラベルをウィドウのcontainerに貼り付けているのですが、そこでもレイアウトのオプションを使っています。 BorderLayoutを使って、東西南北、センターに、ラベルを貼り付けています。
ボタンが一つしかないプログラムなので、ActionPerformedの中で、 ボタン種類のチェックを省略してしまっているところが特徴です。
こんなのをつくってください。 左のテキストフィールドに文字を書き込むことができます。 left to rightボタンを押すと、その文字が右のフィールドに転送されます。 clearボタンを押すと、文字が消えます。
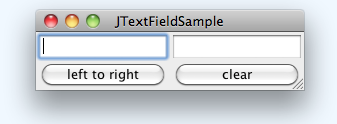
BorderLayoutでもできるようですが、私はGridLayour使ってみました。
 		panel.setLayout(new GridLayout(2,2));
		panel.add(textleft);
		panel.add(textright);
		panel.add(button);
		panel.add(clearbutton);
ボタンが複数になるので、ActionPerformedの中で、ボタンを区別する必要があります。
解答例
(数人が完成したら解答例を公開します)
import java.awt.*;
import javax.swing.*;
import java.awt.event.*;

public class JTextFieldSample extends JFrame implements ActionListener {
	JButton button, clearButton;
	JTextField textleft, textright;

	JTextFieldSample(String title) {
		setTitle(title);
		button = new JButton("left to right");
		clearButton = new JButton("clear");
		button.addActionListener(this);
		clearButton.addActionListener(this);

		textleft = new JTextField(10);
		textright = new JTextField(10);
		JPanel panel=new JPanel();
		panel.setLayout(new GridLayout(2,2));
		panel.add(textleft);
		panel.add(textright);
		panel.add(button);
		panel.add(clearButton);
		Container container=this.getContentPane();
		container.add(panel);
	}

	public void actionPerformed(ActionEvent e) {
		if(e.getSource()==(button)) {
			textright.setText(textleft.getText());
			textleft.setText("");
		}else if(e.getSource()==(clearButton)) {
			textright.setText("");
		}
	}

	public static void main(String[] args) {
		JTextFieldSample sample = new JTextFieldSample("JTextFieldSample");
		sample.pack();
		sample.setVisible(true);
		sample.setDefaultCloseOperation(JFrame.EXIT_ON_CLOSE);
	}
}
(解答例を見て実行できたら次に進んでください)
System.out.println((JButton)(e.getSource()).getText());
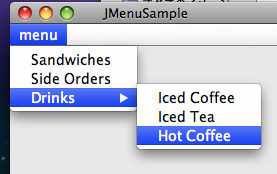
ここではJMenuBarインスタンスをJFrameにsetMenuBarメソッドで取り付けています。 JMenuBarインスタンスにはJMenuインスタンスを貼り付けることができます。 これがメニューバーに現れる項目になります。 メニューバー項目をクリックして現れるメニュー項目がJMenuItemのインスタンスです。 JMenuItemのインスタンスはaddメソッドでJMenuBarに貼り付けます。
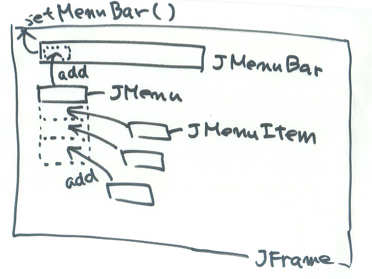
JMenuItemの代わりに、JMenuBarのインスタンスをaddメソッドでJMenuBarに貼り付けると、 カスケードメニューが作れます。
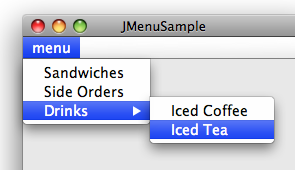
メニューアイテムにcommandという情報をつけて、ActionPerformedではこれを使ってメニュー項目を区別しています。
教科書203ページのプログラム13.6の5行めのところに、
... implements ActionListener6: {
とありますが、これは、
... implements ActionListener {
の間違いのようです。
マウスイベントを受け取るには、Mouse ListenerやMouse Motion Listenerなどをインプリメントします。 以下のようにするとイベントをうけとれるます。 以下のプログラムを動かして試して見てください。
import java.awt.*;
import javax.swing.*;
import java.awt.event.*;

public class MouseTest extends JFrame implements MouseListener, MouseMotionListener{

	public void mouseClicked(MouseEvent e) {
		System.out.println("mouse clicked!");
	}
	public void mouseEntered(MouseEvent e) {
		System.out.println("mouse entered!");
	}
	public void mouseExited(MouseEvent e) {
		System.out.println("mouse exited!");
	}
	public void mousePressed(MouseEvent e) {
		System.out.println("mouse pressed!");
	}
	public void mouseReleased(MouseEvent e) {
		System.out.println("mouse released!");
	}
	public void mouseDragged(MouseEvent e) {
		System.out.println("mouse dragged!");
	}
	public void mouseMoved(MouseEvent e) {
		System.out.println("mouse moved!");
	}

	public static void main(String[] args) {
		MouseTest test = new MouseTest();
		test.setTitle("MouseTest");
		test.addMouseListener(test);
		test.addMouseMotionListener(test);
		test.setSize(400,300);
		test.setVisible(true);
		test.setDefaultCloseOperation(JFrame.EXIT_ON_CLOSE);
	}

}
TAの皆さんの指示に従って、テストを受けて、相互で採点してください。

をダウンロードして、cat.jpgというファイルを作るプログラムを作りました。 解答例は以下でした。
解答例
import java.io.*;
import java.net.*;

//http://siio.jp/cat.jpg
//をダウンロードして、cat.jpgというファイルを作るプログラム

public class URLJpeg {
	public static void main (String argv[]) {
		try {
			URL targetURL = new URL("http://siio.jp/cat.jpg");
			InputStream istream = targetURL.openStream();

			FileOutputStream fout = new FileOutputStream("cat.jpg");

			int aData;
			while((aData  = istream.read()) != -1) fout.write(aData);

			istream.close();
			fout.close();


		} catch (IOException e) {
			System.out.println("error...");
		}
	}
}
上記の例では写真データを1バイトずつ読み書きしていました。 InputStreamのメソッドを調べると、複数バイト単位で読み込むメソッドがあります。 たとえば、512バイトずつ読み書きすることで、処理速度が向上すると期待できます。 そこで、複数バイト読み書きするよう、上記のプログラムを変更して、 実際にどの程度(実行速度にして何倍くらい)性能向上するか確認してみましょう。
read

public int read(byte[] b)
         throws IOException
入力ストリームから配列長さだけのバイト数を読み込もうとし、それをバッファ配列 b に格納します。
実際に読み込まれたバイト数は整数として返されます。
戻り値は、バッファに読み込まれたバイトの合計数。ストリームの終わりに達してデータがない場合は -1
を使って読みこみ、
write

public void write(byte[] b,
                  int off,
                  int len)
           throws IOException
指定された byte 配列の、オフセット位置 off から始まる len バイトを出力ストリームに書き込みます。
を使ってください。
byte[] data = new byte[512];
という配列を用意して、
	int datalength;
	while(( datalength=istream.read(data)) != -1) fout.write(data, 0, datalength);
とします。
このヒントでは512バイトを読み込むことにしています。でも、InputStreamのメソッドを見ると、available()というのがあります。
available()
この入力ストリームのメソッドの次の呼出しによって、ブロックせずにこの入力ストリームから読み込むことができる(またはスキップできる)推定バイト数を返します。
これを使えば、適切な長さを見積もれるかもしれません。
curlというコマンドがあります。
curl http://ocha.ac.jp/
などとすると、htmlが見られますし、
curl http://siio.jp/cat.jpg > cat.jpg
などとすると、ファイルとして保存できます。 上のプログラムを発展させて、curlに近いプログラムを作ってみましょう。
また、ここでも1バイトずつ読み込むのではなく、まとめて読むことで速度の改善を図りましょう。
上記の引数のURLをファイルにするプログラムを作ってください。 また、cat.jpgのファイル取得で、1バイトずつ読むのに比べて、 まとめて読むことでどれくらい速度が改善したかを、 レポートにしてください。レポートの書式は任意です。(テキストファイルでかまいません)
これらのjava, class, レポートのファイルをまとめて、出席番号+名前のフォルダに入れて、 圧縮して提出してください。
プログラム12.1を参考にして、上記の、継承を使ったプログラムによるウィンドウの中に、 Hello!という文字を出してみよう。
解答例:
import javax.swing.*;
import java.awt.*;

public class SimpleWindow extends JFrame {

	public void initialize () {
		this.setTitle("私が作った最初の窓");

		JLabel label = new JLabel("Hello!");
		Container container = this.getContentPane();
		container.add(label);
		this.pack();

		this.setVisible(true);
		this.setDefaultCloseOperation(JFrame.EXIT_ON_CLOSE);
	}

	public static void main(String argv[]) {
		SimpleWindow sw = new SimpleWindow();
		sw.initialize();
	}

}
import java.io.*;

public class DoutTest {
	public static void main (String[] args) {
		try {
			FileOutputStream fout = new FileOutputStream("dout.dat");
			DataOutputStream dout = new DataOutputStream(fout);
			dout.writeInt(100);
			dout.close();

		}catch (Exception e) {
			System.out.println(e);
		}
	}
}
これでdout.datという名前のファイルができあがるはずです。 作ったファイルを
od -h dout.dat
または
hexdump dout.dat
してみてください
e100:java siio$ hexdump dout.dat
0000000 00 00 00 64
0000004
import java.io.*;

public class DoutTest {
	public static void main (String[] args) {
		try {
			FileOutputStream fout = new FileOutputStream("dout.dat");
			DataOutputStream dout = new DataOutputStream(fout);
			dout.writeInt(100);
			dout.close();

			FileInputStream finput = new FileInputStream("dout.dat");
			DataInputStream dinput = new DataInputStream(finput);
			System.out.println(dinput.readInt());
			dinput.close();

		}catch (Exception e) {
			System.out.println(e);
		}
	}
}
作ったファイルを
od -h dout.dat
または
hexdump dout.dat
してみてください
解答例
import java.io.*;

public class En111 {
	public static void main (String[] args) {
		int i;
		try {
			FileOutputStream fout = new FileOutputStream ("dout.dat");
			DataOutputStream dout = new DataOutputStream(fout);
			for(i=1;i<101;i++) dout.writeInt(i);
			dout.close();

			FileInputStream fin = new FileInputStream ("dout.dat");
			DataInputStream din = new DataInputStream(fin);

			for(i=1;i<101;i++) System.out.println(din.readInt());
			din.close();

		} catch (FileNotFoundException e) {
			System.out.println(e);
		} catch (IOException e) {
			System.out.println(e);
		}
	}
}
作ったファイルを
od -h
または
hexdump
してみてください

import java.io.*;

public class PrintWriterTest{
	public static void main(String[] args) {
		try {
		//writer.txtというファイルを作って文字を書き込む
			FileWriter fwriter = new FileWriter("writer.txt");
			PrintWriter pwriter = new PrintWriter(fwriter);
			pwriter.println(2006);
			pwriter.println("Java教科書");
			//fwriter.write("Java教科書");
			pwriter.close();
		}
		catch (IOException e) {
			System.out.println(e);
		}
	}
}
つぎに、プログラム11.4を参考にして、 このPrint Write Testに書き足して、 書き込んだデータを読み出して画面に表示するプログラムを作ってください。
ヒント:
import java.io.*;

public class PrintWriterTest{
	public static void main(String[] args) {
		try {
		//writer.txtというファイルを作って文字を書き込む
			FileWriter fwriter = new FileWriter("writer.txt");
			PrintWriter pwriter = new PrintWriter(fwriter);
			pwriter.println(2006);
			pwriter.println("Java教科書");
			//fwriter.write("Java教科書");
			pwriter.close();


			 ここに書き足す


		}
		catch (IOException e) {
			System.out.println(e);
		}
	}
}
import java.io.*;

public class PrintWriterTest{
	public static void main(String[] args) {
		try {
		//writer.txtというファイルを作って文字を書き込む
			FileWriter fwriter = new FileWriter("writer.txt");
			PrintWriter pwriter = new PrintWriter(fwriter);
			pwriter.println("java 教科書" + 2001 );
			pwriter.close();
		//writer.txtのファイルの中身をSystem.out.printlnで表示する
			FileReader freader = new FileReader("writer.txt");
			BufferedReader breader = new BufferedReader(freader);
			String tmp;
			while( (tmp=breader.readLine() ) != null) {
				System.out.println(tmp);
			}
			breader.close();
		}
		catch (IOException e) {
			System.out.println(e);
		}
	}
}
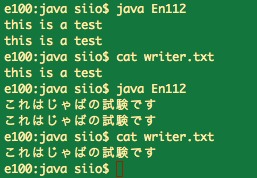
キーボードから1行入力された文字列によるテキストファイルを作る
ヒント
 import java.io.*;

 public class En112 {
 	public static void main(String[] args) {

 		try {


ここにプログラムを書く

 			}
			catch(IOException e) {
 				System.out.println(e);
  			}
    }
 }
解答例
import java.io.*;

public class En112 {
	public static void main(String[] args) {

		try {
			InputStreamReader ireader = new InputStreamReader (System.in);
			BufferedReader breaderK = new BufferedReader(ireader);
			String line = breaderK.readLine();

			FileWriter fwriter = new FileWriter("writer.txt");
			PrintWriter pwriter = new PrintWriter(fwriter);
			pwriter.println(line);
			pwriter.close();

			FileReader freader = new FileReader("writer.txt");
			BufferedReader breaderF = new BufferedReader(freader);

			String tmp=null;
			while(  (tmp=breaderF.readLine())  != null)
				System.out.println(tmp);

			breaderF.close();

			}
			catch(IOException e) {
				System.out.println(e);
			}
	}
}
ヒント1
import java.net.*;
が必要です。
URL targetURL = new URL("http://www.ocha.ac.jp/");
でURLクラスのインスタンスが得られる。
InputStream istream = targetURL.openStream();
でこれからInputStreamのインスタンスが得られる。
InputStreamReader isreader = new InputStreamReader(istream);
でこれからInputStreamReaderのインスタンスが得られる。
BufferedReader breader = new BufferedReader( isreader );
でこれからBufferedReader のインスタンスが得られる。
ヒント2
import java.io.*;
import java.net.*;

public class URLTest {
	public static void main (String argv[]) {
		try {


			 ここにプログラムを書く


		} catch (IOException e) {
			System.out.println("error...");
		}
	}
}
ヒント3:
import java.io.*;
import java.net.*;

public class URLTest {
	public static void main (String argv[]) {
		try {
			URL targetURL = new URL("http://www.ocha.ac.jp/");
			InputStream istream = targetURL.openStream();
			InputStreamReader isreader = new InputStreamReader(istream);
			BufferedReader breader = new BufferedReader(  isreader );

ここで一行ずつ読み込む

		} catch (IOException e) {
			System.out.println("error...");
		}
	}
}
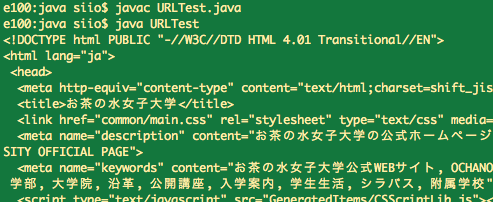
解答例:
import java.io.*;
import java.net.*;

public class URLTest {
	public static void main (String argv[]) {
		try {
			URL targetURL = new URL("http://www.ocha.ac.jp/");
			InputStream istream = targetURL.openStream();
			InputStreamReader isreader = new InputStreamReader(istream);
			BufferedReader breader = new BufferedReader(  isreader );

			String line;
			while((line=breader.readLine()) != null) System.out.println(line);

		} catch (IOException e) {
			System.out.println("error...");
		}
	}
}
http://siio.jp/cat.jpg
をダウンロードして、cat.jpgというファイルを作るプログラムを作ってください。 データはテキストじゃなくて、バイナリーです。
ヒント1:
InputStreamのインスタンスに対してread()メソッドを使うと1バイトのデータが得られます。読み終わると-1になります。 1バイトのデータを書き出すなら、FileOutputStreamだけで可能です。
ヒント2:
import java.io.*;
import java.net.*;

public class URLJpeg {
	public static void main (String argv[]) {
		try {
			URL targetURL = new URL("http://siio.jp/cat.jpg");
			InputStream istream = targetURL.openStream();

			FileOutputStream fout = new FileOutputStream("cat.jpg");
というインスタンスを作って、
istream.read()
で読んで、
fout.write(1バイト)
で書き出します。
解答例
import java.io.*;
import java.net.*;

//http://siio.jp/cat.jpg
//をダウンロードして、cat.jpgというファイルを作るプログラム

public class URLJpeg {
	public static void main (String argv[]) {
		try {
			URL targetURL = new URL("http://siio.jp/cat.jpg");
			InputStream istream = targetURL.openStream();

			FileOutputStream fout = new FileOutputStream("cat.jpg");

			int aData;
			while((aData  = istream.read()) != -1) fout.write(aData);

			istream.close();
			fout.close();


		} catch (IOException e) {
			System.out.println("error...");
		}
	}
}
import javax.swing.JFrame;
public class SimpleWindow {

       public static void main(String argv[]) {
               JFrame f = new JFrame("私が作った最初の窓");
               f.setSize(200,100);
               f.setDefaultCloseOperation(JFrame.EXIT_ON_CLOSE);
               f.setVisible(true);
       }
}
import javax.swing.JFrame;
public class SimpleWindow extends JFrame {

	public void initialize () {
		this.setTitle("私が作った最初の窓");
		this.setSize(200,100);
		this.setDefaultCloseOperation(JFrame.EXIT_ON_CLOSE);
		this.setVisible(true);
	}

	public static void main (String argv[]) {
		SimpleWindow sw = new SimpleWindow();
		sw.initialize();
	}
}
上記のプログラム(URLJpeg.java, URLJpeg.class) を、出席番号+名前のフォルダにいれて、ZIP圧縮して提出してください。`
プログラム12.1を参考にして、上記の、継承を使ったプログラムによるウィンドウの中に、 Hello!という文字を出してみよう。
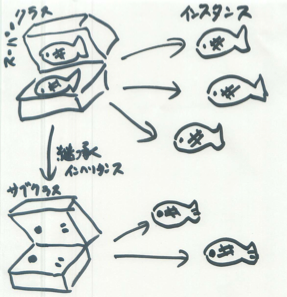
継承の話をしました。 別のクラスを継承することで、 差分だけを書いて機能を拡張していくことができます。
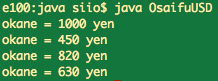
public class OsaifuUSD extends Osaifu {
	public static void main(String argv[]) {
		OsaifuUSD saifu1= new OsaifuUSD();
		OsaifuUSD saifu2=new OsaifuUSD();
		saifu1.in(1000);
		saifu2.inUSD(5);
		saifu2.inUSD(saifu1.outUSD(2));
		saifu1.print();
		saifu2.print();
	}
public class OsaifuUSD extends Osaifu {

	public int outUSD(int usd) {
		okane-=usd * 90;
		return usd;
	}

	public void inUSD(int usd) {
		okane+=usd * 90;
	}

	public static void main(String argv[]) {
		OsaifuUSD saifu1 = new OsaifuUSD();
		OsaifuUSD saifu2 = new OsaifuUSD();
		saifu1.in(1000);
		saifu2.inUSD(5);
		saifu1.print();
		saifu2.print();
		saifu2.inUSD(saifu1.outUSD(2));
		saifu1.print();
		saifu2.print();

	}
}
親のメソッドを活用しても良い
public class OsaifuUSD extends Osaifu {

	public int outUSD(int usd) {
		return ( out( use * 90) / 90 );
	}

	public void inUSD(int usd) {
		in( usd * 90 );
	}

…

}
親のメソッドを呼ぶことを明示的に書くためにsuper.をつかってもよい。
public class OsaifuUSD extends Osaifu {

	public int outUSD(int usd) {
		return ( super.out( use * 90) / 90 );
	}

	public void inUSD(int usd) {
		super.in( usd * 90 );
	}

…

}
OsaifuUSDにprint()メソッドを追加して、 円表示の次の行に ( xxx USD ) と残高をUSD表示するようにしてください。 円表示を行う部分はスーパークラスOsaifuのインスタンスメソッドprint()を利用することを考えてみてください。
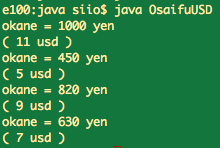
	public void print() {
		super.print();
		System.out.println("( " + (okane / 90) + " usd )" );
	}
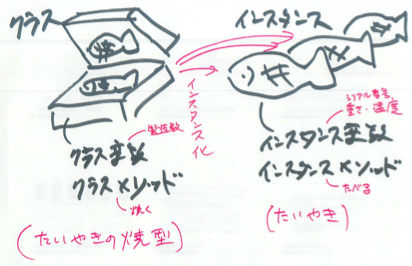
以下のプログラムの中で、 クラス、インスタンス、サブクラス、スーパクラス、クラスメソッド、インスタンスメソッドがどれであり、 インスタンス化、継承がどこで行われているのか確認してください。 (importで始まる一行目はまだ説明していない内容なので小テストでは扱いません。無視してください)
import javax.swing.JFrame;

 public class SampleWindow extends JFrame {
	public static void main(String args[]) {
		SampleWindow w = new SampleWindow();
 		w.setVisible(true);
	}
 }
次のプログラムを作って試してください。 引数が少ないとエラーが出るのを確認してください。
public class TestException {
	public static void main(String argv[]){
			System.out.println(argv[0]+" "+argv[1]);
			System.out.println("Nice to meet you.");
	}
}
エラーが出る可能性のある場所をtryでくくっておき、 エラーが出たらそれを細くする処置をcatchで指定します。
public class TestException {
	public static void main(String argv[]){
		try{
			System.out.println(argv[0]+" "+argv[1]);
			System.out.println("Nice to meet you.");
		}
		catch (Exception e) {
			System.out.println("please input 2 words.");
		}
	}
}
[e100:?/Documents/java] siio% java TestString ochanomizu
ochanomizu
uzimonahco
[e100:?/Documents/java] siio%
このソースは、
public class TestString {
	public static void main (String argv[]) {
		try{
			System.out.println(argv[0]);
			int len = argv[0].length();
			for(int i = len - 1; i>=0; i--) {
				System.out.print(argv[0].charAt(i));
			}
			System.out.println();
		}
		catch (Exception e) {
			System.out.println("please input a word");
		}
	}
}
である。
サンプルプログラムを実行するときは、
LinkedList<String> list = new LinkedList<String>();
などと定義すると良い。
Alice --> Bob --> Cindy --> DaveというLinkedListをつくって、 それからtoArray()メソッドでString配列を作ってfor each文で要素を印刷する
import java.util.*;

public class LinkedListTest{

        public static void main(String[] argv) {

                LinkedList<String> list = new LinkedList<String>();
                list.add("Alice");
                list.add("Bob");
                list.add("Dave");
                list.add("Cindy");

                Object[] names = list.toArray();

                for(Object s: names ) System.out.println(s);

        }

}
教科書の10.5節をよんでください。 プログラム10.4を参考にして、 以下のように動作する英語ー日本語単語変換プログラムを作ってください。 次回の授業の最初に、いつものような方法で提出していただきます。
[e100:?/Documents/java] siio% java EtoJ banana
バナナ
[e100:?/Documents/java] siio% java EtoJ apple
りんご
[e100:?/Documents/java] siio% java EtoJ
Please input an English word
ヒント:
import java.util.*;

public class EtoJ{

public static void main(String args[]) {
	HashMap<String,String> map = new HashMap<String,String>();

…..
今週と椎尾は手術入院でお休みします。 その代わり自習とします。
それぞれの課題は、次のページをみてください。
例えば以下のような実行結果が出るようにしてください
public class Point {
	private int x, y;
	void set(int newx, int newy) {x=newx; y=newy;}
	int getx() { return x;}
	int gety() { return y;}

	void print () {
		System.out.println(x + ", " + y);
	}

	public static void main(String argv[]) {
		Point pt1= new Point();
		Point pt2 = new Point();
		pt1.set(10,20);
		pt2.set(-pt1.getx(), -pt1.gety());
		pt1.print();
		pt2.print();
	}

}
10, 20, 30
-10, -20, -30
という結果が出るようにしましょう
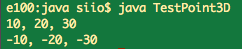
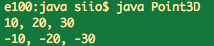
       public static void main(String argv[]) {
               Point3D pt1 = new Point3D();
               Point3D pt2 = new Point3D();
               pt1.set(10, 20, 30);//インスタンス変数を設定
               pt2.set(-pt1.getx(), -pt1.gety(), -pt1.getz());
               pt1.print();//インスタンスメソッド呼出
               pt2.print();

       }
10, 20, 30
-10, -20, -30
74.83314773547883
という結果が出るようにしましょう
       public static void main(String argv[]) {
               Point3D pt1 = new Point3D();
               Point3D pt2 = new Point3D();
               pt1.set(10, 20, 30);//インスタンス変数を設定
               pt2.set(-pt1.getx(), -pt1.gety(), -pt1.getz());
               pt1.print();//インスタンスメソッド呼出
               pt2.print();

               System.out.println(pt1.distance(pt2));

       }
	double distance ( int ptx, int pty, int ptz ) {
		int dx = ptx - this.x;
		int dy = pty - this.y;
		int dz = ptz - this.z;
		return  Math.sqrt(dx * dx + dy * dy + dz * dz);
	}

	double distance ( Point3D p ) {
		return this.distance(p.getx(), p.gety(), p.getz());
	}

こちらからダウンロードできます。 演習室のOSにあわせたバージョンをダウンロードします。
https://coteditor.com/archives.ja
class ArgsTest {
public static void main (String argv[]) {
	System.out.println(argv[0]);
        }
}

解答
class ArgsTest {
public static void main (String args[]) {
	System.out.println(args[0] + " + " + args[1]);
        }
}
乱数を10個表示する
public class Score {
	public static void main (String argv[]) {
		int i,a;
		for(i=0;i<10;i++) {
			a=(int)(Math.random() * 100);
			System.out.println(a);
		}
	}
}
次にこの乱数を点数とみなして、演習問題5.4の基準に従ってABCDEを表示するプログラムを書け。 動作例を以下に示す。
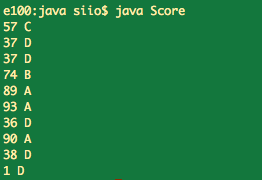
解答例:
public class Score {
	public static void main (String argv[]) {
		int i,a;
		for(i=0;i<10;i++) {
			a=(int)(Math.random() * 100);
			System.out.print(a + " ");
			if(a<40) System.out.println("D");
			else if(a<60) System.out.println("C");
			else if(a<80) System.out.println("B");
			else System.out.println("A");
		}
	}
}
class ArrayTest {
public static void main (String args[]) {
	int[] vec = new int[3];
	vec[0]=1;
	vec[1]=2;
	vec[2]=3;
	for (int x: vec) {
	     System.out.println(x);
	     }
       }
}
mainの引数argsは、Stringの配列で、コマンドラインで起動したとき、 コマンドの後に続けた書いた文字が入っています。 args[0], args[1], args[2] .... をすべてfor-each文で 表示するプログラムを書いてみましょう。
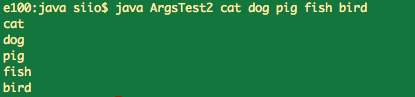
ヒント:for(String s: args)を使います
class ArgsTest2 {
public static void main (String args[]) {
	for(String s: args)
	    System.out.println(s);
       }
}
3/4以上出席してください。(欠席は3回まで)欠席4回で自動的に不可になります。
http://docs.oracle.com/javase/jp/8/docs/api/index.html
/home/isstaff/siio/Public/Drop Box/.
に提出してください。ターミナル.appからなら
cp 123456siioitiro.zip /home/isstaff/siio/Public/Drop\ Box
としてください。ファインダーからなら、メニューから「移動」「フォルダへ移動...」を選んで 以下のように入力して、移動ボタンを押して、そこに現れるドロップボックスホルダに、ドラッグアンドドロップしてください。

/home/isstaff/siio/Public/Drop Box/.に提出してください。ターミナル.appからなら
cp 123456siioitiro.zip /home/isstaff/siio/Public/Drop\ Boxとしてください。ファインダーからなら、メニューから「移動」「フォルダへ移動...」を選んで 以下のように入力して、移動ボタンを押して、そこに現れるドロップボックスホルダに、ドラッグアンドドロップしてください。

http://www.amazon.co.jp/dp/4883732258/
買ってください。もしくは、先輩から安く譲ってもらってください。
Mac OS XはJavaと相性が良く、最初からjavaがインストールされています。 ということでWindowsより簡単に(というか何もしなくても)javaが使えます。


/.bash_profileを開いて以下の行を追加します
alias javac='javac -J-Dfile.encoding=UTF-8'
alias java='java -Dfile.encoding=UTF-8'


class Hello {
public static void main (String args[]) {
        System.out.println("hello java world!");
        }
}

javac Hello.java  (コンパイルする)
java Hello      (実行する。.javaなどの拡張子は不要)
hello java world!   (結果)
授業の最後の方で紹介する,Swingというフレームワークを使ってウィンドウを出してみます.
import javax.swing.JFrame;
public class SimpleWindow {

       public static void main(String argv[]) {
               JFrame f = new JFrame("私が作った最初の窓");
               f.setSize(200,100);
               f.setVisible(true);
       }

}
これをSimpleWindow.javaという名前で保存して、
javac SimpleWindow.java
java SimpleWindow
とタイプしてコンパイル/実行します。 このプログラムは,ウィンドウのクローズボタンを押しても終了しません. プログラムを停止するには,ターミナルでコントロール-cを押します.

学部「ヒューマンインタフェース」は出席重視の授業です.そのため70%以上出席お願いします. 授業回数が15回程度と見込まれますので,欠席が4回を超えた場合は単位が出ません. 以下に授業全体の欠席状況を示しておきます. 欠席回数は成績に大きく影響しますので、間違いありましたら至急お知らせください.
| 学籍番号 | 4月8日 | 4月15日 | 4月22日 | 5月6日 | 5月13日 | 5月20日 | 5月27日 | 6月3日 | 6月17日 | 6月24日 | 7月1日 | 7月15日 | 7月22日 | 7月29日 | 出席点 |
| 1420501 | 出 | 出 | 出 | 出 | 出 | 出 | 出 | 出 | 出 | 出 | 出 | 欠 | 出 | 出 | |
| 1420502 | 出 | 出 | 出 | 出 | 出 | 出 | 出 | 出 | 出 | 出 | 出 | 出 | 出 | 出 | |
| 1420503 | 出 | 出 | 出 | 出 | 出 | 出 | 出 | 出 | 出 | 出 | 出 | 出 | 欠 | 出 | |
| 1420504 | 出 | 出 | 出 | 出 | 出 | 出 | 出 | 出 | 出 | 出 | 出 | 出 | 出 | 欠 | |
| 1420505 | 出 | 出 | 出 | 出 | 出 | 出 | 出 | 欠 | 出 | 出 | 出 | 出 | 出 | 出 | |
| 1420506 | 出 | 出 | 出 | 出 | 出 | 出 | 出 | 出 | 出 | 出 | 出 | 出 | 出 | 出 | |
| 1420507 | 出 | 出 | 出 | 出 | 出 | 出 | 出 | 出 | 出 | 出 | 出 | 出 | 出 | 出 | |
| 1420508 | 出 | 欠 | 出 | 出 | 出 | 出 | 出 | 出 | 出 | 出 | 出 | 出 | 出 | 出 | |
| 1420509 | 出 | 出 | 出 | 出 | 出 | 出 | 出 | 出 | 出 | 出 | 出 | 出 | 出 | 出 | |
| 1420510 | 出 | 出 | 出 | 出 | 出 | 出 | 出 | 出 | 出 | 欠 | 欠 | 出 | 出 | 出 | |
| 1420511 | 出 | 出 | 出 | 出 | 出 | 出 | 出 | 出 | 出 | 出 | 出 | 出 | 出 | 出 | |
| 1420512 | 出 | 出 | 出 | 出 | 出 | 出 | 出 | 出 | 出 | 出 | 出 | 出 | 出 | 出 | |
| 1420513 | 出 | 出 | 出 | 出 | 出 | 出 | 出 | 出 | 出 | 出 | 出 | 出 | 出 | 出 | |
| 1420514 | 出 | 出 | 出 | 出 | 出 | 出 | 出 | 出 | 出 | 出 | 出 | 出 | 出 | 出 | |
| 1420515 | 出 | 出 | 出 | 出 | 出 | 出 | 出 | 出 | 出 | 出 | 出 | 出 | 出 | 出 | |
| 1420516 | 出 | 出 | 出 | 出 | 出 | 出 | 出 | 出 | 欠 | 出 | 出 | 出 | 出 | 出 | |
| 1420517 | 出 | 出 | 出 | 出 | 出 | 出 | 出 | 出 | 出 | 出 | 出 | 出 | 出 | 出 | |
| 1420518 | 出 | 出 | 出 | 出 | 出 | 出 | 出 | 出 | 出 | 出 | 出 | 出 | 出 | 出 | |
| 1420519 | 出 | 出 | 出 | 出 | 出 | 出 | 出 | 出 | 出 | 出 | 出 | 出 | 出 | 出 | |
| 1420520 | 出 | 出 | 出 | 出 | 出 | 出 | 出 | 出 | 出 | 出 | 出 | 出 | 出 | 欠 | |
| 1420521 | 出 | 出 | 出 | 出 | 出 | 出 | 出 | 出 | 出 | 出 | 出 | 出 | 出 | 出 | |
| 1420522 | 出 | 出 | 出 | 出 | 出 | 出 | 欠 | 出 | 出 | 出 | 出 | 出 | 出 | 欠 | |
| 1420523 | 出 | 出 | 出 | 出 | 欠 | 出 | 出 | 出 | 出 | 出 | 出 | 出 | 出 | 出 | |
| 1420525 | 出 | 出 | 出 | 出 | 出 | 出 | 出 | 出 | 出 | 出 | 出 | 出 | 出 | 出 | |
| 1420526 | 出 | 出 | 出 | 出 | 出 | 出 | 出 | 出 | 出 | 出 | 出 | 出 | 欠 | 欠 | |
| 1420527 | 出 | 出 | 出 | 出 | 出 | 出 | 出 | 出 | 出 | 出 | 出 | 出 | 出 | 出 | |
| 1420528 | 出 | 出 | 出 | 出 | 出 | 出 | 出 | 出 | 出 | 出 | 出 | 出 | 出 | 出 | |
| 1420529 | 出 | 出 | 欠 | 欠 | 出 | 欠 | 出 | 出 | 出 | 出 | 出 | 出 | 欠 | 出 | |
| 1420530 | 出 | 出 | 出 | 出 | 出 | 出 | 出 | 出 | 出 | 出 | 出 | 出 | 出 | 出 | |
| 1420531 | 出 | 出 | 出 | 出 | 出 | 出 | 出 | 出 | 出 | 出 | 出 | 欠 | 出 | 欠 | |
| 1420532 | 出 | 出 | 出 | 出 | 出 | 出 | 出 | 出 | 出 | 出 | 出 | 欠 | 出 | 欠 | |
| 1420533 | 出 | 出 | 出 | 出 | 出 | 出 | 出 | 出 | 出 | 出 | 出 | 出 | 出 | 出 | |
| 1420534 | 出 | 出 | 出 | 出 | 出 | 出 | 出 | 出 | 出 | 出 | 出 | 出 | 出 | 出 | |
| 1420535 | 出 | 出 | 出 | 出 | 出 | 出 | 出 | 出 | 出 | 出 | 出 | 出 | 出 | 出 | |
| 1420536 | 出 | 出 | 出 | 出 | 欠 | 出 | 出 | 出 | 出 | 出 | 出 | 出 | 出 | 出 | |
| 1420537 | 出 | 出 | 出 | 出 | 出 | 出 | 出 | 出 | 出 | 出 | 出 | 出 | 出 | 出 | |
| 1420538 | 出 | 出 | 出 | 出 | 出 | 欠 | 出 | 出 | 出 | 出 | 出 | 出 | 出 | 出 | |
| 1420539 | 出 | 出 | 出 | 出 | 出 | 出 | 出 | 出 | 出 | 出 | 出 | 出 | 出 | 出 | |
| 1420540 | 出 | 出 | 出 | 出 | 出 | 出 | 出 | 出 | 出 | 出 | 出 | 出 | 出 | 出 | |
| 1420541 | 出 | 出 | 出 | 出 | 出 | 出 | 出 | 出 | 出 | 出 | 出 | 出 | 出 | 出 | |
| 1220116 | 出 | 欠 | 欠 | 欠 | 欠 | 欠 | 欠 | 欠 | 欠 | 欠 | 欠 | 欠 | 欠 | 欠 | 不可 |
| 1220121 | 出 | 出 | 出 | 欠 | 出 | 出 | 出 | 欠 | 出 | 出 | 出 | 出 | 出 | 出 |
| 提出日 | 学籍番号もしくはペンネーム |
| 2016/8/31 | 1420512 |
| 2016/8/31 | 1420513 |
| 2016/8/31 | zzz |
| 2016/8/31 | 1420507 |

http://www.amazon.co.jp/dp/4781912605/
(授業開始直前や直後に差し替えされている可能性があります。)